PROJECT INFORMATION
|
|
INSTITUTION NAME |
University of Girona |
ESTIMATED DURATION |
2,5 – 3 hours |
AGE OF KIDS ADRESSED |
12 – 14 yo students, but the activity can be adapted for older students introducing other kind of concepts |
MATERIALS |
PC, completely assembled ARDUBOT (or similar) Mobile Robot (Arduino UNO-based robot), USB programming cable, Arduino software. 1 standard table |
TECHNOLOGY |
Offline activity, but Arduino software must be downloaded from the Arduino web site (https://www.arduino.cc/en/Main/Software) |
Nº OF STUDENTS |
Groups of 2 students. The number of groups depends on the number of ARDUBOT (or similar) robots + PCs available. Maximum 20 students |
Nº OF STUDENTS/TEACHER |
2 |
Nº OF STUDENTS/RESOURCE |
2 students |
CODING ACTIVITY GOAL
|
Introduce textual programming to the students by means of the resolution of simple problems related to concepts linked with the operation of a mobile robot.
|
SPECIAL REQUIREMENTS |
||
Knowledge level |
Skills required |
|
Teacher |
Basic knowledge about electronics, programming (mainly Arduino-based systems) and PC configuration (establishing USB and serial ports, installing drivers, …). (Visit “help” menu in Sketch window-Arduino software) |
— |
Student |
some previous knowledge about basic electronics is required (LEDs, DC motors, encoders, optical sensors, …), and also some knowledge about programming basics. |
— |
To take into account |
It is important to know that it is necessary to have a completely assembled ARDUBOT robot to be able to do the activity. |
|
PROJECT DESCRIPTION
Build small pieces of programs that control different elements of ARDUBOT: Initialize the different actuators (motors and leds) and sensors (bumper, encoders, optical sensors, etc.) of the robot. Inputs and outputs. Structure of a program, include libraries and definitions. Programming interface. Control the activity leds of the robot. Move the robot a specific distance (here, we have the opportunity to introduce the mathematical concepts related to odometry and encoders). Change the velocity of the robot (working with PWM).
STEPS TO FOLLOW TO CARRY OUT THE ACTIVITY
1.- Download ARDUINO software and install it in the computer (Help to teachers could be required to install drivers and to check that all are OK). Aprox. 30 minutes.
Download the software from the website http://www.arduino.cc//
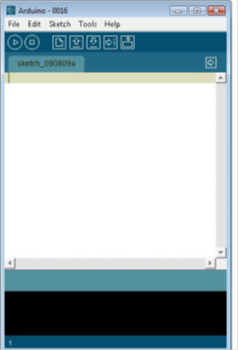
In Fig. 2 it is shown the Arduino program interface. It is possible to Write a new program, Verify and Stop a program, Open and Save a file, open the Serial Console, Load the program to the board, etc.
In the option Tools / Board it is possible to select the Arduino board model (Arduino UNO in this specific case)
In the option Tools / Serial Port it is possible to select the communications port used to connect our computer with the Arduino board.
2.- Analyze the structure of an Arduino program (Includes, Definitions, Initializations, Code, …)
In Fig. 4 it is shown a diagram with the basic structure of an Arduino program
3.- Build or rewrite a very simple TEST program and upload it to the robot: Testing the program. Time required to do 2 and 3 (to write, to check it for errors, to upload it to the board) is aprox. 10 minutes
Here a very simple TEST example “blinking red led one second”
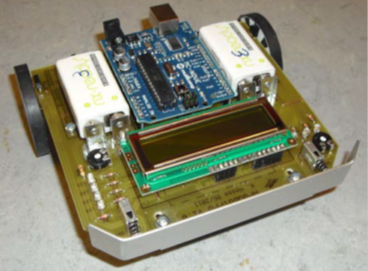
#define red 8 //you can see the Fig.3 and check that red led is connected to digital output 8
int timer =1000; // timer = 1000 means 1 second
void setup()
{
pinMode(red,OUTPUT);
}
Void loop()
{
digitalWrite(red,HIGH);
delay(timer);
digitalWrite(red,LOW);
delay(timer);
}
You can now make changes in the different lines of the code and analyze what are the new result.
4.-Operation of the robot when hitting an obstacle (using switch placed in front of the robot)
Here another very simple example related to reading the state of a switch (input). The led located at the output 8 will follow the state of that specific input (switch connected to input 13). Time aprox. 30 minutes (including changes and different kind of trials)
unsigned char switchstate
void setup()
{
pinMode (13,INPUT);
pinMode (8,OUTPUT);
}
void loop()
{
switchstate=digitalRead(13);
if (switchstate==HIGH)
{
digitalWrite(8,HIGH);
}
else
{
digitalWrite(8,LOW);
}
}
Here an if-else programming structure is introduced.
5.-Start moving the robot: specific distances and turnings (working with encoders, and odometry concepts. Setting up PWM for the two motors-wheels)
You have to look at the documentation to analyze how to deal with PWM signals to be sent to the motors to control the speed, and how to read the signals coming from the encoders to compute the distance covered by the robot and the turning ratio.
Ardubot.h library is also described to facilitate programming of different resources of the Arduino board (I/O pin configurations, I/O operations, PWM management, using encoders, etc.)
Time required to explain all the concepts related to PWM and speed of the motors, use of encoders and Ardubot library, checking the program, and trying to test different kind of proposals is aprox. 75 minutes.
As a very simple example, imagine you want to move the robot forward at maximum speed. Then, we have:
include Ardubot.h
void setup()
{
Ardubot.SETpinMode(); //configuration of all the I/O pins
Ardubot.InitPWM(); // configuration of all the timers involved on the generation of PWM signals
}
void loop()
{
Ardubot.SETpwm(100,100); // left and right motor to maximum speed forward
// we can set the values between -100 (maximum speed reverse) and +100 (maximum speed forward)
}
It is possible to follow more examples available on the documentation of the activity.
PHOTOS/VIDEOS OF THE ACTIVITY


LINKS RELATED TO THE PROJECT
- ARDUINO web site: www.arduino.cc
- Document describing ARDUBOT and specific programming issues (still in catalan)
- Document describing Ardubot.h library (still in catalan)
Nice tutorial to get start the arduino programming. I am building a similar project which can be controlled by my cell phone. Here I found a tutorial which I am following: https://circuitdigest.com/microcontroller-projects/dtmf-controlled-robot-using-arduino