PROJECT INFORMATION
|
|
INSTITUTION NAME |
Escola Veïnat |
ESTIMATED DURATION |
2 sessions of 1 hour |
AGE OF KIDS ADRESSED |
10-13 years old |
MATERIALS |
computer and scratch is required |
TECHNOLOGY |
online/offline |
Nº OF STUDENTS |
individually or in pairs |
Nº OF STUDENTS/TEACHER |
10-12 students/teacher |
Nº OF STUDENTS/RESOURCE |
1-2 students/computer |
CODING ACTIVITY GOAL
|
To create a chronometer with Scratch which functions properly and has a counter for seconds and minutes. The idea is to learn angles and geometry concepts in an intuitive way. The activity suits very well for subjects like Maths, Art, or Technology.
|
SPECIAL REQUIREMENTS |
||
Knowledge level |
Skills required |
|
Teacher |
medium |
scratch and maths |
Student |
medium/high |
scratch and maths (geometry) |
PROJECT DESCRIPTION
The activity we wish to detail is the creation of a chronometer with Scratch which functions properly and has a counter for seconds and minutes. The first step would be to choose different programming “sprites”: a white clock face, showing the seconds and minutes and two characters for the respective marker.
Once chosen these programming objects will go to different programs (very simple) that will allow us to achieve other goals. The challenge which will be found the most interesting by the students will be to discover the angle that would be necessary to turn the clock each second or minute. Both the clock and the hands can be images from the Internet or drawings made by the children.
STEPS TO FOLLOW TO CARRY OUT THE ACTIVITY
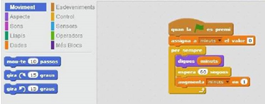
Here we see the computer programming that it centers the white clock face.
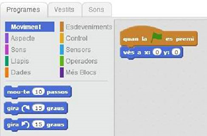
This one it’s the one we use to center the showing seconds with the white clock face and it shows 12, at the same time it starts to move forward 1 second each second. This is where the children should deduct the angle that the seconds hand turn every second. The teacher should guide students toward discovery and let themselves find the solution.
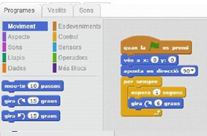
Next one it’s the one we use to center the showing minutes with the white face and it shows 12, at the same time it moves forward 1 minute each 60 seconds. As in the previous step, here the students should discover the angle by themselves.
This one it’s used to show us how the character counts the seconds at the same time it moves forward every second. These last two steps are optional and are used to introduce the concept of variable. The idea is to create two variables that are counting and showing the seconds and minutes.
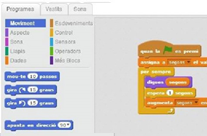
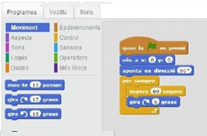
The following one it’s used to show us how the character counts the minutes at the same time it moves forward every minute.
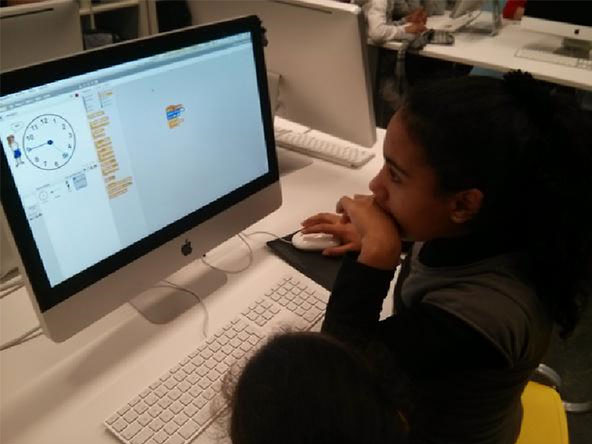
PHOTOS/VIDEOS OF THE ACTIVITY

LINKS RELATED TO THE PROJECT
1.Some theory for secondary and high school students: https://sites.google.com/site/mymathclassroom/trigonometry/clock-angle-problems/clock-angle-problem-formula”